> ## Documentation Index
> Fetch the complete documentation index at: https://docs.gr4vy.com/llms.txt
> Use this file to discover all available pages before exploring further.
# Google Pay on Android without the SDK
It is possible to use Google Pay without the SDK.
## About this integration
Even without the Android SDK, there is only minimal configuration required to get set up to process Google Pay. Unlike
some other integrations it does not require you to sign up for a Google Developer account.
## Enable Google Pay
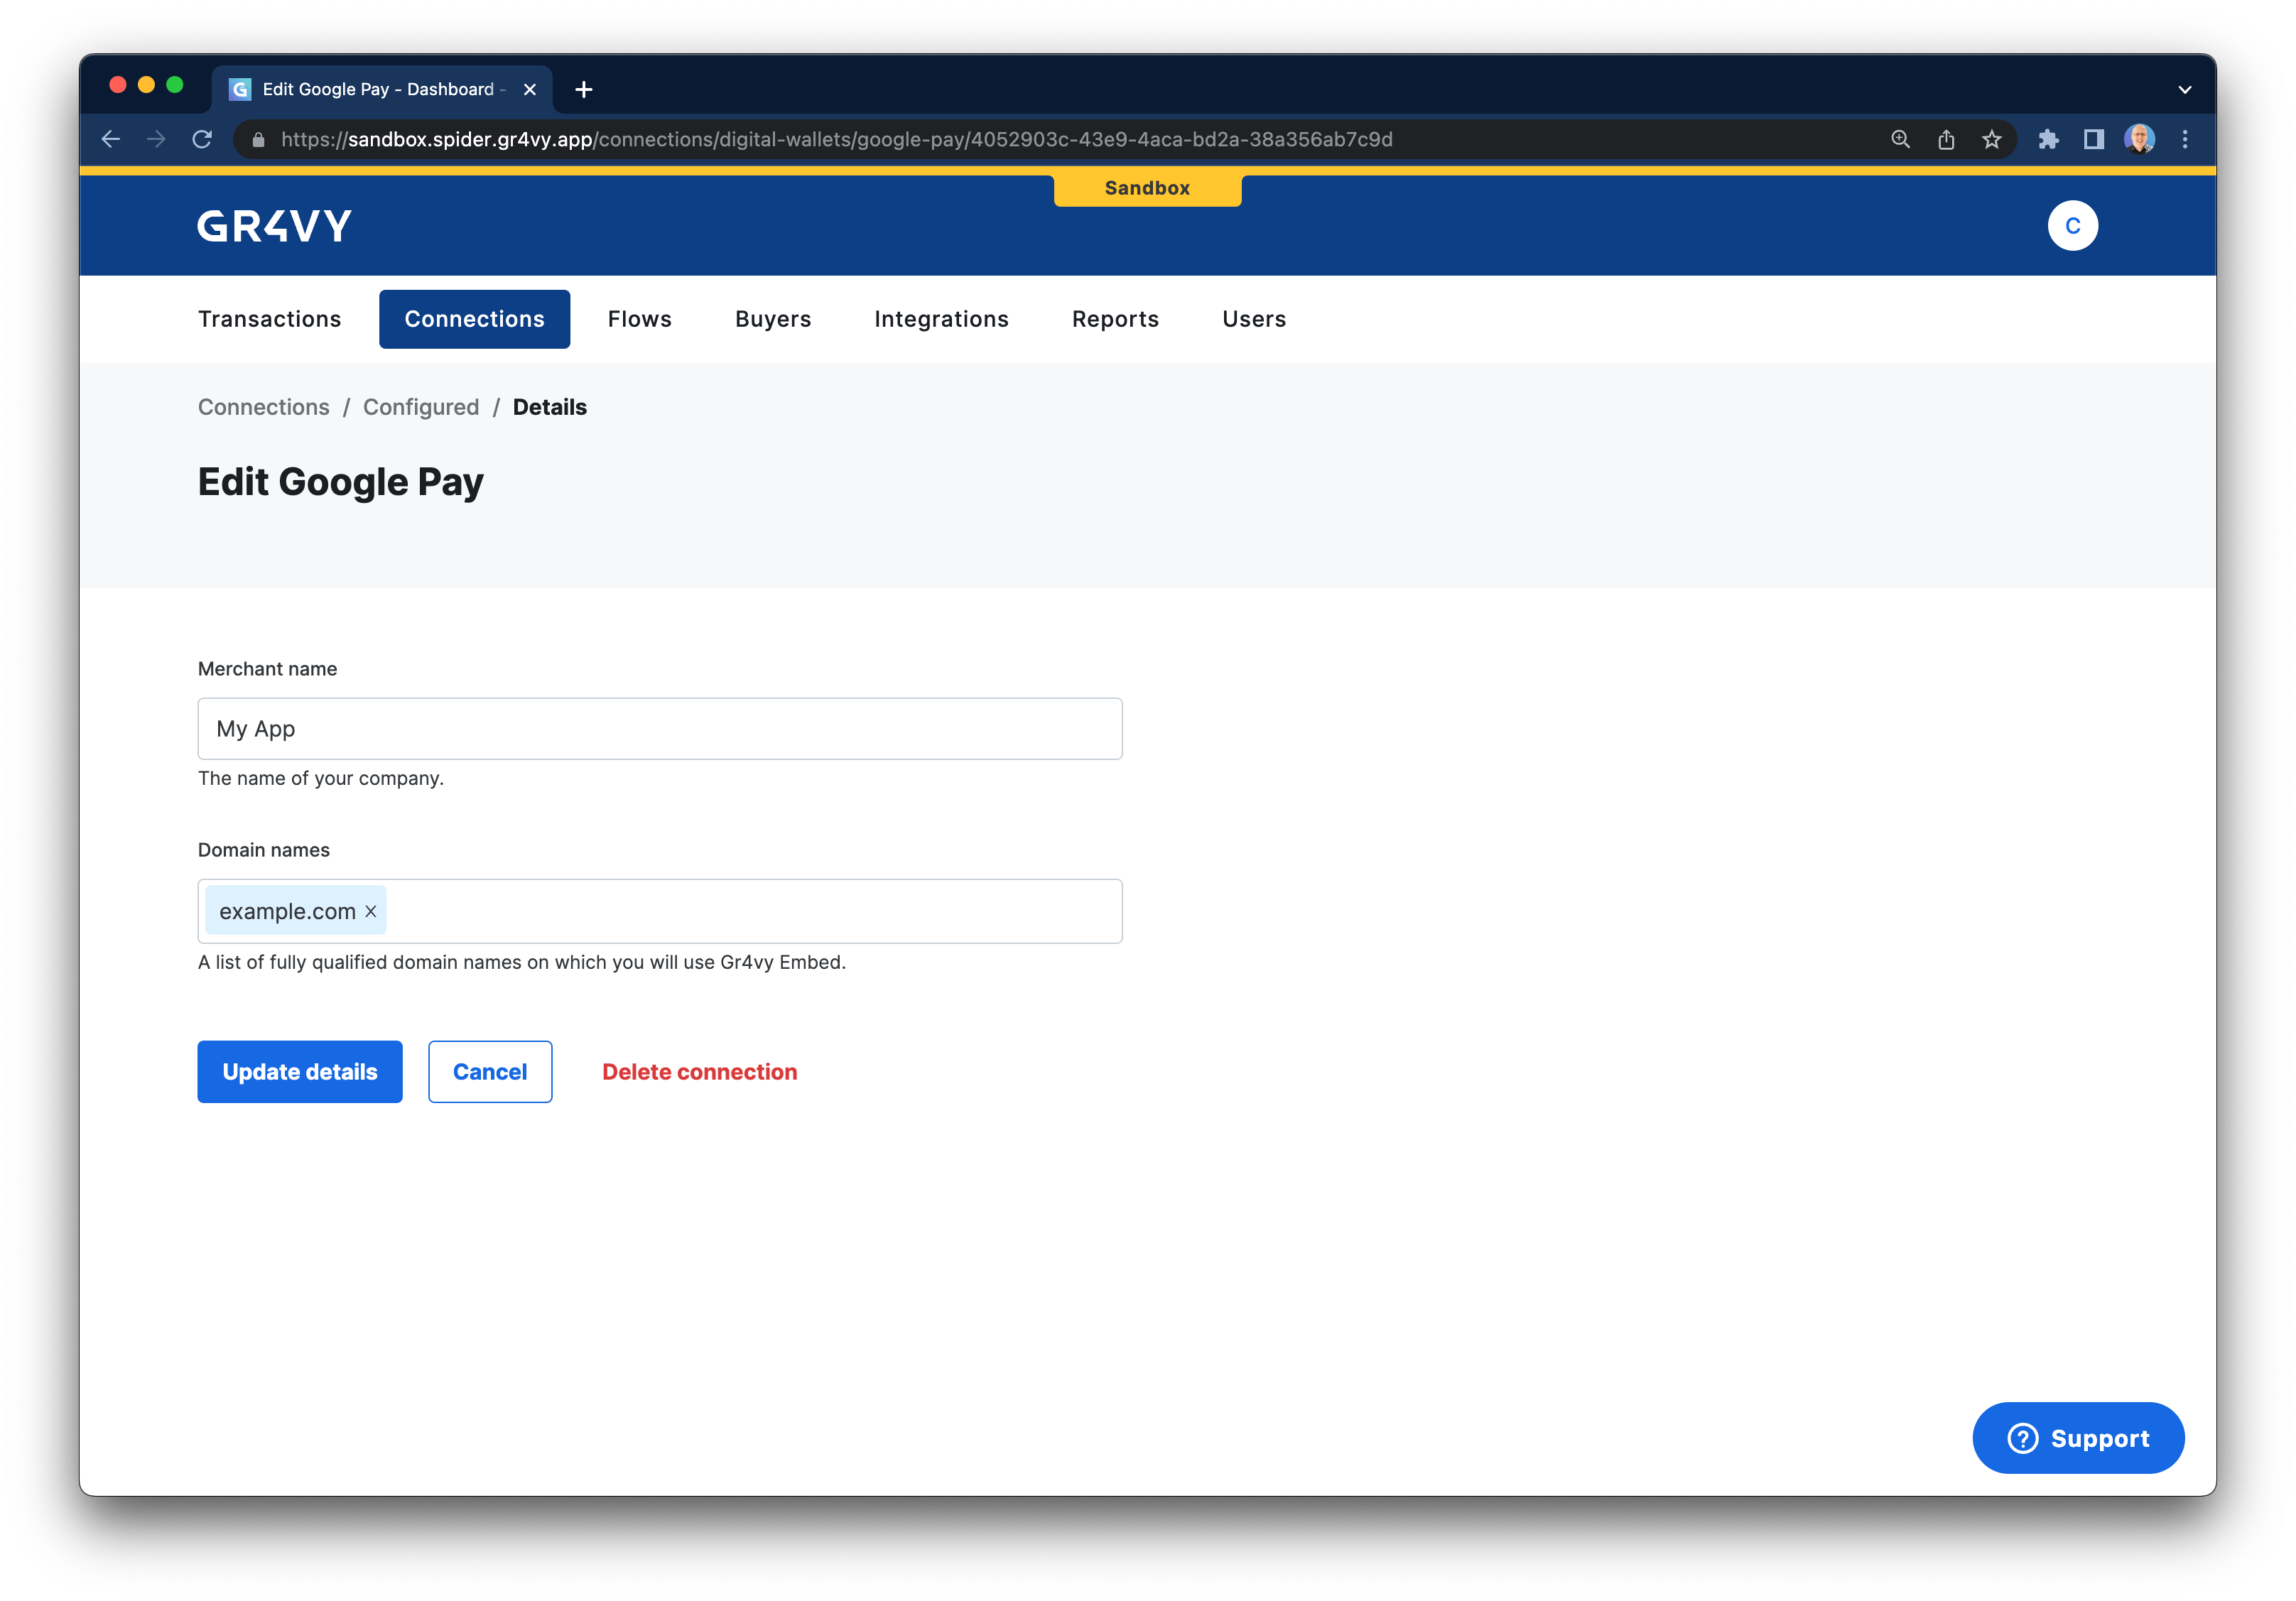
To enable Google Pay, head over to your dashboard and then go to
**Connections** -> **Catalog** -> **Google Pay**.
Next, fill in your merchant name and the one or more domain names where you want to
use Google Pay.
 ## Integrate Google Pay
To learn how to integrate Google Pay, following Google's [tutorial][tutorial] is recommended. The steps below highlight any differences
and specifics for the API.
### Set gateway and merchant ID
In step 2 of [Google's tutorial][tutorial] you are instructed to request a payment token for your provider.
In this case, the value for `gateway` needs to be set to `gr4vy`, and the value of `gatewayMerchantId` needs
to be set to `app.gr4vy.sandbox.[gr4vy_id].[merchant_account_id]` for your sandbox environment, and
`app.gr4vy.[gr4vy_id].[merchant_account_id]` in production.
```java Java theme={"system"}
private static JSONObject getGatewayTokenizationSpecification() throws JSONException {
return new JSONObject() {{
put("type", "PAYMENT_GATEWAY");
put("parameters", new JSONObject() {{
put("gateway", "gr4vy");
put("gatewayMerchantId", "app.gr4vy.sandbox.example.default");
}});
}};
}
```
```kotlin Kotlin theme={"system"}
private fun gatewayTokenizationSpecification(): JSONObject {
return JSONObject().apply {
put("type", "PAYMENT_GATEWAY")
put("parameters", JSONObject(mapOf(
"gateway" to "gr4vy",
"gatewayMerchantId" to "app.gr4vy.sandbox.example.default")))
}
}
```
The instance ID is the unique identifier for the deployment of the system and is included in every API call.
Together with the environment (sandbox or production) it is used to connect to the right APIs, as well as dashboard.
### Create a transaction
In step 9 of Google's tutorial, you have a `paymentData` that needs to be
sent to the gateway. You can send this object to the [`POST /transactions`](/reference/transactions/new-transaction#google-pay-payment-method-create)
endpoint either directly or via your server.
The payment method used needs to contain the data from the Google Pay payload.
```json Payment method data theme={"system"}
{
"amount": 1299,
"currency": "AUD",
"country": "AU",
"payment_method": {
"method": "googlepay",
"token": "[paymentData.paymentMethodData.tokenizationData.token]",
"card_suffix": "[paymentData.paymentMethodData.info.cardDetails]",
"card_scheme": "[paymentData.paymentMethodData.info.cardNetwork]",
"redirect_url": "https://example.com/callback"
}
}
```
We strongly recommend always providing a `redirect_url`, just in case any connection
is configured to use 3-D Secure.
This URL will be appended with both a transaction ID
and status (for example `https://example.com/callback?transaction_id=123
&transaction_status=capture_succeeded`) after 3-D Secure has been completed.
In React Native you can use the [@google/react-native-make-payment](https://github.com/google-pay/react-native-make-payment) package
to integrate Google Pay. This package uses the W3C Payment Request API.
### Install the package
Install the package using npm:
```bash theme={"system"}
npm install @google/react-native-make-payment
```
### Configure the payment request
Set up the Google Pay payment request with your merchant identifier and gateway ID.
Set the `gateway` value to `gr4vy` and the `gatewayMerchantId` to your environment,
for example `app.gr4vy.sandbox.[gr4vy_id].[merchant_account_id]`.
```js theme={"system"}
import {
PaymentRequest,
type W3CGooglePayPaymentMethod,
type GooglePayPaymentDataRequest
} from '@google/react-native-make-payment';
// Configure Google Pay request
const googlePayRequest: GooglePayPaymentDataRequest = {
apiVersion: 2,
apiVersionMinor: 0,
allowedPaymentMethods: [
{
type: 'CARD',
parameters: {
allowedAuthMethods: ['PAN_ONLY', 'CRYPTOGRAM_3DS'],
allowedCardNetworks: ['VISA', 'MASTERCARD'],
},
tokenizationSpecification: {
type: 'PAYMENT_GATEWAY',
parameters: {
gateway: 'gr4vy',
gatewayMerchantId: 'app.gr4vy.sandbox.example.default',
},
},
},
],
merchantInfo: {
merchantName: 'Example Merchant',
},
};
// Configure payment details
const paymentDetails = {
total: {
amount: {
currency: 'AUD',
value: '12.99',
},
},
};
// Create payment methods array
const paymentMethods: W3CGooglePayPaymentMethod[] = [
{
supportedMethods: 'google_pay',
data: googlePayRequest,
},
];
```
The instance ID is the unique identifier for the deployment of the system and is included in every API call.
Together with the environment (sandbox or production) it is used to connect to the right APIs, as well as dashboard.
### Process the payment
Create a payment request and check if Google Pay is available before showing the payment sheet.
```js theme={"system"}
const paymentRequest = new PaymentRequest(paymentMethods, paymentDetails);
paymentRequest.canMakePayment()
.then((canMakePayment) => {
if (canMakePayment) {
paymentRequest.show()
.then((response) => {
// Extract the token from the response
const token = response.paymentMethodData.tokenizationData.token;
// Send to Gr4vy API
return fetch('https://api.example.gr4vy.app/transactions', {
method: 'POST',
headers: {
'Authorization': 'Bearer [TOKEN]',
'Content-Type': 'application/json',
},
body: JSON.stringify({
amount: 1299,
currency: 'AUD',
payment_method: {
method: 'googlepay',
token: token,
redirect_url: 'https://example.com/callback',
},
}),
})
.then(res => res.json())
.then((transaction) => {
console.log('Payment successful', transaction);
return transaction;
})
.catch((error) => {
console.error('Payment failed', error);
throw error;
});
})
.catch((error) => {
// Handle payment sheet cancellation or errors
console.error('Payment sheet error', error);
});
} else {
// Google Pay unavailable
console.log('Google Pay is not available');
}
})
.catch((error) => {
// Handle canMakePayment errors
console.error('Error checking Google Pay availability', error);
});
```
We strongly recommend always providing a `redirect_url`, just in case any connection
is configured to use 3-D Secure. This can be set to an application URL or URN if needed.
This URL will be appended with both a transaction ID
and status (for example `https://example.com/callback?transaction_id=123
&transaction_status=capture_succeeded`) after 3-D Secure has been completed.
## Test Google Pay
Please follow the Google Pay documentation with further guides on how
to add [test cards](https://developers.google.com/pay/api/android/guides/resources/test-card-suite) for use in
a sandbox environment.
## Common issues
The OR\_BIBED\_11 error typically occurs due to configuration mismatches between your app and Google Pay settings. Check the following:
### SHA-256 certificate mismatch
1. In [Google Play Console](https://play.google.com/console), go to **App Integrity** → **App signing key certificate**
2. Copy the SHA-256 certificate fingerprint
3. In [Google Pay & Wallet Console](https://pay.google.com/business/console), go to **Your Merchant** → **Android apps**
4. Verify the SHA-256 matches exactly
5. Ensure the status shows as **Approved**
### Google Pay merchant approval
Confirm your app entry in the [Google Pay & Wallet Console](https://pay.google.com/business/console) is approved (not pending).
### AndroidManifest metadata
Ensure the required metadata is present in your AndroidManifest.xml:
```xml theme={"system"}
```
If any of these don't match (especially the SHA-256 certificate), updating the configuration typically resolves this error.
[tutorial]: https://developers.google.com/pay/api/android/guides/tutorial
## Integrate Google Pay
To learn how to integrate Google Pay, following Google's [tutorial][tutorial] is recommended. The steps below highlight any differences
and specifics for the API.
### Set gateway and merchant ID
In step 2 of [Google's tutorial][tutorial] you are instructed to request a payment token for your provider.
In this case, the value for `gateway` needs to be set to `gr4vy`, and the value of `gatewayMerchantId` needs
to be set to `app.gr4vy.sandbox.[gr4vy_id].[merchant_account_id]` for your sandbox environment, and
`app.gr4vy.[gr4vy_id].[merchant_account_id]` in production.
```java Java theme={"system"}
private static JSONObject getGatewayTokenizationSpecification() throws JSONException {
return new JSONObject() {{
put("type", "PAYMENT_GATEWAY");
put("parameters", new JSONObject() {{
put("gateway", "gr4vy");
put("gatewayMerchantId", "app.gr4vy.sandbox.example.default");
}});
}};
}
```
```kotlin Kotlin theme={"system"}
private fun gatewayTokenizationSpecification(): JSONObject {
return JSONObject().apply {
put("type", "PAYMENT_GATEWAY")
put("parameters", JSONObject(mapOf(
"gateway" to "gr4vy",
"gatewayMerchantId" to "app.gr4vy.sandbox.example.default")))
}
}
```
The instance ID is the unique identifier for the deployment of the system and is included in every API call.
Together with the environment (sandbox or production) it is used to connect to the right APIs, as well as dashboard.
### Create a transaction
In step 9 of Google's tutorial, you have a `paymentData` that needs to be
sent to the gateway. You can send this object to the [`POST /transactions`](/reference/transactions/new-transaction#google-pay-payment-method-create)
endpoint either directly or via your server.
The payment method used needs to contain the data from the Google Pay payload.
```json Payment method data theme={"system"}
{
"amount": 1299,
"currency": "AUD",
"country": "AU",
"payment_method": {
"method": "googlepay",
"token": "[paymentData.paymentMethodData.tokenizationData.token]",
"card_suffix": "[paymentData.paymentMethodData.info.cardDetails]",
"card_scheme": "[paymentData.paymentMethodData.info.cardNetwork]",
"redirect_url": "https://example.com/callback"
}
}
```
We strongly recommend always providing a `redirect_url`, just in case any connection
is configured to use 3-D Secure.
This URL will be appended with both a transaction ID
and status (for example `https://example.com/callback?transaction_id=123
&transaction_status=capture_succeeded`) after 3-D Secure has been completed.
In React Native you can use the [@google/react-native-make-payment](https://github.com/google-pay/react-native-make-payment) package
to integrate Google Pay. This package uses the W3C Payment Request API.
### Install the package
Install the package using npm:
```bash theme={"system"}
npm install @google/react-native-make-payment
```
### Configure the payment request
Set up the Google Pay payment request with your merchant identifier and gateway ID.
Set the `gateway` value to `gr4vy` and the `gatewayMerchantId` to your environment,
for example `app.gr4vy.sandbox.[gr4vy_id].[merchant_account_id]`.
```js theme={"system"}
import {
PaymentRequest,
type W3CGooglePayPaymentMethod,
type GooglePayPaymentDataRequest
} from '@google/react-native-make-payment';
// Configure Google Pay request
const googlePayRequest: GooglePayPaymentDataRequest = {
apiVersion: 2,
apiVersionMinor: 0,
allowedPaymentMethods: [
{
type: 'CARD',
parameters: {
allowedAuthMethods: ['PAN_ONLY', 'CRYPTOGRAM_3DS'],
allowedCardNetworks: ['VISA', 'MASTERCARD'],
},
tokenizationSpecification: {
type: 'PAYMENT_GATEWAY',
parameters: {
gateway: 'gr4vy',
gatewayMerchantId: 'app.gr4vy.sandbox.example.default',
},
},
},
],
merchantInfo: {
merchantName: 'Example Merchant',
},
};
// Configure payment details
const paymentDetails = {
total: {
amount: {
currency: 'AUD',
value: '12.99',
},
},
};
// Create payment methods array
const paymentMethods: W3CGooglePayPaymentMethod[] = [
{
supportedMethods: 'google_pay',
data: googlePayRequest,
},
];
```
The instance ID is the unique identifier for the deployment of the system and is included in every API call.
Together with the environment (sandbox or production) it is used to connect to the right APIs, as well as dashboard.
### Process the payment
Create a payment request and check if Google Pay is available before showing the payment sheet.
```js theme={"system"}
const paymentRequest = new PaymentRequest(paymentMethods, paymentDetails);
paymentRequest.canMakePayment()
.then((canMakePayment) => {
if (canMakePayment) {
paymentRequest.show()
.then((response) => {
// Extract the token from the response
const token = response.paymentMethodData.tokenizationData.token;
// Send to Gr4vy API
return fetch('https://api.example.gr4vy.app/transactions', {
method: 'POST',
headers: {
'Authorization': 'Bearer [TOKEN]',
'Content-Type': 'application/json',
},
body: JSON.stringify({
amount: 1299,
currency: 'AUD',
payment_method: {
method: 'googlepay',
token: token,
redirect_url: 'https://example.com/callback',
},
}),
})
.then(res => res.json())
.then((transaction) => {
console.log('Payment successful', transaction);
return transaction;
})
.catch((error) => {
console.error('Payment failed', error);
throw error;
});
})
.catch((error) => {
// Handle payment sheet cancellation or errors
console.error('Payment sheet error', error);
});
} else {
// Google Pay unavailable
console.log('Google Pay is not available');
}
})
.catch((error) => {
// Handle canMakePayment errors
console.error('Error checking Google Pay availability', error);
});
```
We strongly recommend always providing a `redirect_url`, just in case any connection
is configured to use 3-D Secure. This can be set to an application URL or URN if needed.
This URL will be appended with both a transaction ID
and status (for example `https://example.com/callback?transaction_id=123
&transaction_status=capture_succeeded`) after 3-D Secure has been completed.
## Test Google Pay
Please follow the Google Pay documentation with further guides on how
to add [test cards](https://developers.google.com/pay/api/android/guides/resources/test-card-suite) for use in
a sandbox environment.
## Common issues
The OR\_BIBED\_11 error typically occurs due to configuration mismatches between your app and Google Pay settings. Check the following:
### SHA-256 certificate mismatch
1. In [Google Play Console](https://play.google.com/console), go to **App Integrity** → **App signing key certificate**
2. Copy the SHA-256 certificate fingerprint
3. In [Google Pay & Wallet Console](https://pay.google.com/business/console), go to **Your Merchant** → **Android apps**
4. Verify the SHA-256 matches exactly
5. Ensure the status shows as **Approved**
### Google Pay merchant approval
Confirm your app entry in the [Google Pay & Wallet Console](https://pay.google.com/business/console) is approved (not pending).
### AndroidManifest metadata
Ensure the required metadata is present in your AndroidManifest.xml:
```xml theme={"system"}
```
If any of these don't match (especially the SHA-256 certificate), updating the configuration typically resolves this error.
[tutorial]: https://developers.google.com/pay/api/android/guides/tutorial