> ## Documentation Index
> Fetch the complete documentation index at: https://docs.gr4vy.com/llms.txt
> Use this file to discover all available pages before exploring further.
# Apple Pay on iOS with the SDK
Both the native iOS SDK and React Native SDKs support native Apple Pay out of the box.
## About this integration
The SDK requires you to perform the following steps to get set up.
* Enable Apple Pay in your merchant dashboard.
* Sign up for an Apple Pay Developer account and [register a payment processing certificate](/guides/features/apple-pay/ios#register-a-certificate).
* [Add the merchant ID](/guides/features/apple-pay/ios#add-the-certificate-to-your-app) and its processing certificate to your app.
* Pass the merchant ID to the constructor of the SDK.
## Enable Apple Pay
To enable Apple Pay, head over to your dashboard and then go to
**Connections** -> **Catalog** -> **Apple Pay**.
Next, complete, and submit the form to create a new Apple Pay service.
### Register a certificate
To process Apple Pay in a mobile app, register for an
Apple Pay developer account and join the [Apple developer program](https://developer.apple.com/programs/).
Once set up, generate a new Apple Pay processing certificate using the dashboard.
Go to
**Connections** -> **Apple Pay** -> **Certificates** and click **Add certificate**
to start the process.
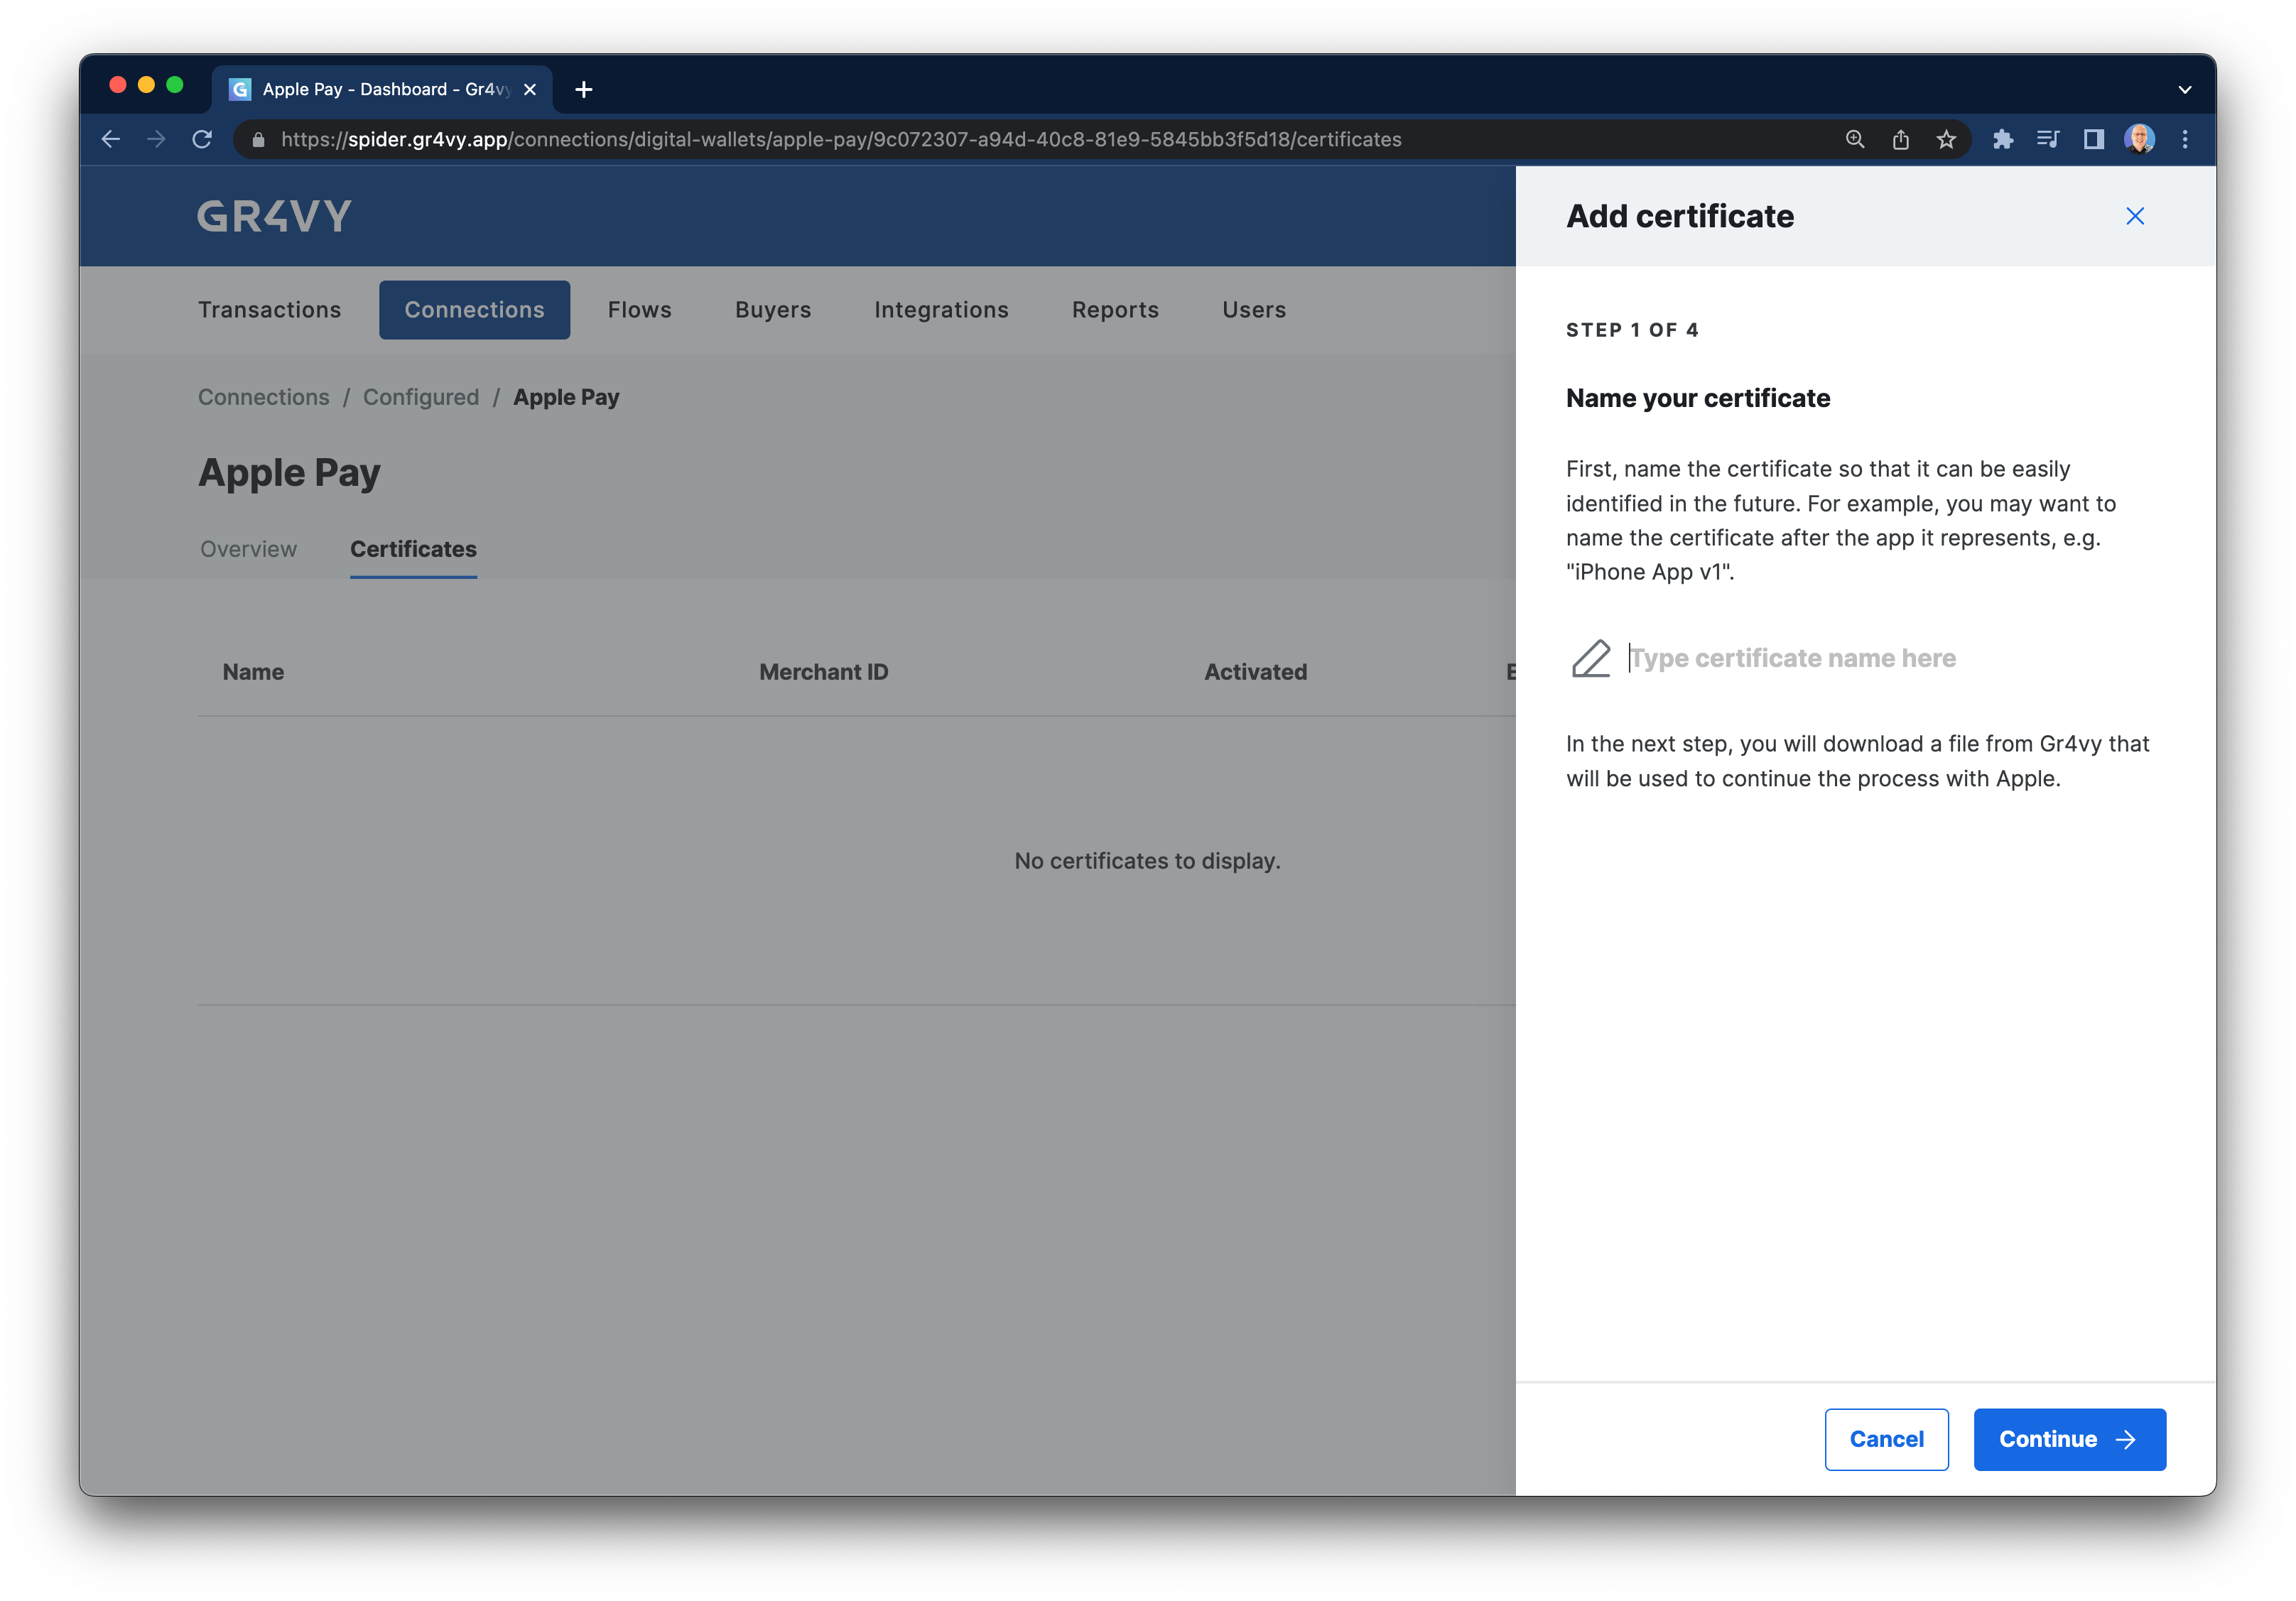 Provide a name and download a **Certificate Signing Request** (CSR).
Next, visit the [Apple developer dashboard](https://developer.apple.com/account/resources/identifiers/list/merchant)
to generate a payment processing certificate.
* Create or select a **Merchant ID** to associate a payment processing certificate with.
* In the **Apple Pay Payment Processing Certificate** section click **Create Certificate**.
* Select **Choose File** to upload the CSR you downloaded from the dashboard, and then Continue.
\*Verify the certificate details and **Download** the signed certificate from Apple.
Next, go back to the dashboard and upload the signed certificate.
### Add the certificate to your app
For the app to accept Apple Pay, set the same Apple **Merchant ID** in the app.
In the Xcode project find the **Signing & Capabilities** in the project editor.
Select the same **Merchant ID** used to register the payment certificate. Please ensure the provisioning profiles
and signing certificates are updated to contain this ID.
## Integrate Apple Pay
### Update SDK initialization
Because the Xcode project can be configured with more than one merchant ID, update the initialization of
the SDK to pass the `applePayMerchantId` to the constructor.
```swift Swift theme={"system"}
import gr4vy_ios
let result = Gr4vy.init(
gr4vyId: "[GR4VY_ID]",
token: "[TOKEN]",
amount: 1299,
currency: "AUD",
country: "AU",
buyerId: nil,
environment: Gr4vyEnvironment.sandbox,
applePayMerchantId: "[MERCHANT_ID]"
)
```
```swift React Native theme={"system"}
import EmbedReactNative from '@gr4vy/embed-react-native';
const handleCheckout = () => {
EmbedReactNative.showPaymentSheet({
gr4vyId: '[GR4VY_ID]',
environment: 'sandbox',
token: '[TOKEN]',
amount: 1299,
currency: 'AUD',
country: 'AU',
applePayMerchantId: "[MERCHANT_ID]"
...
})
}
```
The instance ID is the unique identifier for the deployment of the system and is included in every API call.
Together with the environment (sandbox or production) it is used to connect to the right APIs, as well as dashboard.
## Test Apple Pay
Apple has an extensive [guide on sandbox testing](https://developer.apple.com/apple-pay/sandbox-testing/).
Apple Pay requires a **Sandbox Tester** account to be able to test transactions in the sandbox. Sandbox
Testers can add fake test cards to their account that can then be used in Apple Pay. When a Sandbox Tester account
is used in production, Apple Pay may fail for various reasons. Similarly, when a regular Apple account is configured
on a Mac or iPhone, Apple Pay may fail to load the payment sheet. This may result in the Apple Pay UI quickly appearing
and then disappearing.
### Create a sandbox tester account
A sandbox tester account can be set up in the [**User and Access section**](https://appstoreconnect.apple.com/access/users/sandbox) of a
Apple Developer account. If you do not have an Apple Developer account please contact support and they
can set you up with a Sandbox Tester account under an Apple Developer account.
To set up an account the following details are needed.
* **First and last name**: This can be anything really but using the person's full name is recommended.
* **email:** This needs to be a real email address that is not already an Apple account. This needs to be an email that can receive actual emails.
* **App Store Country or Region:** This can help with any locale testing.
### Setup on device
Once set up, a sandbox tester account can be added to a Mac or iPhone.
Sign in to iCloud with the sandbox tester on macOS (or iOS).
Sign out of the existing iCloud account and sign
in specifically with the sandbox account. This allows you to
register the sandbox cards in the Apple Wallet.
On a Mac, it helps to create a second user account so that you don't need to
log out of your own iCloud account every time you need to test Apple Pay.
One caveat is that only 1 Apple account per Mac can be used to store cards
in the vault, so you'd not be able to use Apple Pay in your own account.
### Add test cards
Next, add a test card from the [Apple Pay docs](https://developer.apple.com/apple-pay/sandbox-testing/). On a Mac this can be done
by going to **System Preferences** -> **Wallet & Apple Pay** -> **Add card**.
### Create sandbox transaction
To make an Apple Pay sandbox transaction the following are required.
* An Apple device with a Sandbox Tester account on it
* An app with an Apple merchant ID associated with it
* A merchant ID with a signed payment processing certificate associated with it
* Apple Pay enabled in the dashboard
* The payment processing certificate registered in the dashboard
* A card processor enabled that can process Apple Pay in the given currency.
For a currency that has a card processor that supports Apple Pay, the
payment option should appear in the app. Select Apple Pay and continue
with the payment. The Apple Pay sheet should appear.
### Create production transaction
To make an Apple Pay transaction in production replace the Sandbox Tester account
with a regular Apple account with real cards.
## Common Issues
There could be many reasons why this doesn't show.
* Make sure the merchant ID is the same as shown in the dashboard
* Make sure the certificate isn't expire
* Make sure an Apple account is set up on the device and cards are added to it
* Make sure the system is set up to handle Apple Pay
* Check the Apple Pay connection is enabled
* Check a card connector is enabled for the selected country/currency
* Check that a Flow rule doesn't hide Apple Pay
There could be a few reasons why this doesn't show but most likely
this means the card was sent to a connector that either doesn't understand
Apple Pay cards, or did not recognize the test card.
This seems to happen at times with the test cards provided by Apple. Try a
different card, or try again later.
Provide a name and download a **Certificate Signing Request** (CSR).
Next, visit the [Apple developer dashboard](https://developer.apple.com/account/resources/identifiers/list/merchant)
to generate a payment processing certificate.
* Create or select a **Merchant ID** to associate a payment processing certificate with.
* In the **Apple Pay Payment Processing Certificate** section click **Create Certificate**.
* Select **Choose File** to upload the CSR you downloaded from the dashboard, and then Continue.
\*Verify the certificate details and **Download** the signed certificate from Apple.
Next, go back to the dashboard and upload the signed certificate.
### Add the certificate to your app
For the app to accept Apple Pay, set the same Apple **Merchant ID** in the app.
In the Xcode project find the **Signing & Capabilities** in the project editor.
Select the same **Merchant ID** used to register the payment certificate. Please ensure the provisioning profiles
and signing certificates are updated to contain this ID.
## Integrate Apple Pay
### Update SDK initialization
Because the Xcode project can be configured with more than one merchant ID, update the initialization of
the SDK to pass the `applePayMerchantId` to the constructor.
```swift Swift theme={"system"}
import gr4vy_ios
let result = Gr4vy.init(
gr4vyId: "[GR4VY_ID]",
token: "[TOKEN]",
amount: 1299,
currency: "AUD",
country: "AU",
buyerId: nil,
environment: Gr4vyEnvironment.sandbox,
applePayMerchantId: "[MERCHANT_ID]"
)
```
```swift React Native theme={"system"}
import EmbedReactNative from '@gr4vy/embed-react-native';
const handleCheckout = () => {
EmbedReactNative.showPaymentSheet({
gr4vyId: '[GR4VY_ID]',
environment: 'sandbox',
token: '[TOKEN]',
amount: 1299,
currency: 'AUD',
country: 'AU',
applePayMerchantId: "[MERCHANT_ID]"
...
})
}
```
The instance ID is the unique identifier for the deployment of the system and is included in every API call.
Together with the environment (sandbox or production) it is used to connect to the right APIs, as well as dashboard.
## Test Apple Pay
Apple has an extensive [guide on sandbox testing](https://developer.apple.com/apple-pay/sandbox-testing/).
Apple Pay requires a **Sandbox Tester** account to be able to test transactions in the sandbox. Sandbox
Testers can add fake test cards to their account that can then be used in Apple Pay. When a Sandbox Tester account
is used in production, Apple Pay may fail for various reasons. Similarly, when a regular Apple account is configured
on a Mac or iPhone, Apple Pay may fail to load the payment sheet. This may result in the Apple Pay UI quickly appearing
and then disappearing.
### Create a sandbox tester account
A sandbox tester account can be set up in the [**User and Access section**](https://appstoreconnect.apple.com/access/users/sandbox) of a
Apple Developer account. If you do not have an Apple Developer account please contact support and they
can set you up with a Sandbox Tester account under an Apple Developer account.
To set up an account the following details are needed.
* **First and last name**: This can be anything really but using the person's full name is recommended.
* **email:** This needs to be a real email address that is not already an Apple account. This needs to be an email that can receive actual emails.
* **App Store Country or Region:** This can help with any locale testing.
### Setup on device
Once set up, a sandbox tester account can be added to a Mac or iPhone.
Sign in to iCloud with the sandbox tester on macOS (or iOS).
Sign out of the existing iCloud account and sign
in specifically with the sandbox account. This allows you to
register the sandbox cards in the Apple Wallet.
On a Mac, it helps to create a second user account so that you don't need to
log out of your own iCloud account every time you need to test Apple Pay.
One caveat is that only 1 Apple account per Mac can be used to store cards
in the vault, so you'd not be able to use Apple Pay in your own account.
### Add test cards
Next, add a test card from the [Apple Pay docs](https://developer.apple.com/apple-pay/sandbox-testing/). On a Mac this can be done
by going to **System Preferences** -> **Wallet & Apple Pay** -> **Add card**.
### Create sandbox transaction
To make an Apple Pay sandbox transaction the following are required.
* An Apple device with a Sandbox Tester account on it
* An app with an Apple merchant ID associated with it
* A merchant ID with a signed payment processing certificate associated with it
* Apple Pay enabled in the dashboard
* The payment processing certificate registered in the dashboard
* A card processor enabled that can process Apple Pay in the given currency.
For a currency that has a card processor that supports Apple Pay, the
payment option should appear in the app. Select Apple Pay and continue
with the payment. The Apple Pay sheet should appear.
### Create production transaction
To make an Apple Pay transaction in production replace the Sandbox Tester account
with a regular Apple account with real cards.
## Common Issues
There could be many reasons why this doesn't show.
* Make sure the merchant ID is the same as shown in the dashboard
* Make sure the certificate isn't expire
* Make sure an Apple account is set up on the device and cards are added to it
* Make sure the system is set up to handle Apple Pay
* Check the Apple Pay connection is enabled
* Check a card connector is enabled for the selected country/currency
* Check that a Flow rule doesn't hide Apple Pay
There could be a few reasons why this doesn't show but most likely
this means the card was sent to a connector that either doesn't understand
Apple Pay cards, or did not recognize the test card.
This seems to happen at times with the test cards provided by Apple. Try a
different card, or try again later.